Summary
Content
Brocade Data Collection
Types of Data Collections:
- Switch/Director data collection via CLI
- Supportsave
- Supportshow
- SANnav data collections
- SANnav SupportSave
- BNA data collections (BNA is end of support)
- BNA switch supportsave
NOTE: More information available at What_Are_the_Different_Types_of_Supportsave_Data
Upload facility
Hitachi Vantara requires all data collections to be uploaded to a central upload site. This is to ensure that all data is collected in a central repository only accessible to authorized Hitachi personnel.
Ensure the file name of each compressed switch supportsave files follows the following naming convention as well to speed up analysis of your data.
We require ZIP (*.zip), TAR (*.tar) and TAR-GZ (*.tgz) archives. Other archives are not recognized.
Supportinfo-*.<zip|tar|tgz>
*supportshow*.<zip|tar|tgz>
*supportsave.*.<zip|tar|tgz>
.*DCX.*.tgz
.*DCB.*.tgz
Please upload all data to How to Upload Files to TUF
Brocade Switch Logs via CLI
Be aware that network and/or host firewall rules need to be adjusted to allow ftp (tcp/20, tcp/21), scp/sftp (tcp/22) connection to be established from the direction of the switch towards the host where the files are to be stored. The switch supportsave data collection is a push-process from the switch to the host. If these are not opened the supportsave process will timeout and report "SupportSave Operation Failed. Reason : 256 Remote Host:Could not connect to remote host."
Some hosts may have limitations imposed on the number of simultaneous and/or sequential login attempts. Ensure these restrictions are removed as well. The supportsave process establishes a new connection for each file it uploads. Although normally the switch closes the connection immediately after the file is uploaded some ftp servers are known to hold on to the session information for some time and therefore may limit new sockets to be opened. That will also result in a failure of the supportsave process.
- Log into the switch via Telnet/SSH
- Collect a supportsave (10-20 minutes)
- After logs are collected, clear stats to create a baseline for port statistics in case additional data is needed. (details below)
- Submit the 'statsclear' command
- Submit the 'slotstatsclear' command
- If FCIP is involved, submit the 'portshow fciptunnel -c --tcp --reset' command
To collect a supportsave execute one of the the following commands (examples use SCP transfer protocol):
Supportsave using interactive mode
7800_L:admin> supportsave
This command collects RASLOG, TRACE, supportShow, core file, FFDC data
and then transfer them to a FTP/SCP/SFTP server or a USB device.
This operation can take several minutes.
NOTE: supportSave will transfer existing trace dump file first, then
automatically generate and transfer latest one. There will be two trace dump
files transferred after this command.
OK to proceed? (yes, y, no, n): [no] yes
Host IP or Host Name: xxx.xxx.xxx.xxx
User Name: name
Password:
Protocol (ftp | scp | sftp): scp
Remote Directory: /home/name/supportsave
Do you want to continue with CRA (Y/N) [N]:
Saving support information for switch:7800_L, module:RAS...
Supportsave using specified user, password, host, remote directory, transfer protocol
7800_L:admin> supportsave -u name -p password -h xxx.xxx.xxx.xxx -d /home/name/supportsave -l scp
This command collects RASLOG, TRACE, supportShow, core file, FFDC data
and then transfer them to a FTP/SCP/SFTP server or a USB device.
This operation can take several minutes.
NOTE: supportSave will transfer existing trace dump file first, then
automatically generate and transfer latest one. There will be two trace dump
files transferred after this command.
OK to proceed? (yes, y, no, n): [no] yes
Saving support information for switch:7800_L, module:RAS...
Supportsave using configured information from supportftp command
7800_L:admin> supportftp
Host IP Addr:
User name:
Remote Dir:
Auto Upload protocol: ftp
Auto-FTP: Off
EGSC_7800_L:admin> supportftp -s -h xxx.xxx.xxx.xxx -u name -p password -d /home/name/supportsave -l scp
supportftp: parameters changed
EGSC_7800_L:admin> supportftp
Host IP Addr: xxx.xxx.xxx.xxx
User name: name
Remote Dir: /home/name/supportsave
Auto Upload protocol: scp
Auto-FTP: Off
7800_L:admin> supportsave -c
This command collects RASLOG, TRACE, supportShow, core file, FFDC data
and then transfer them to a FTP/SCP/SFTP server or a USB device.
This operation can take several minutes.
NOTE: supportSave will transfer existing trace dump file first, then
automatically generate and transfer latest one. There will be two trace dump
files transferred after this command.
OK to proceed? (yes, y, no, n): [no] yes
Saving support information for switch:7800_L, module:RAS...
Where "xxx.xxx.xxx.xxx" is the IP address of the host where the files need to be transferred to and "<directory>" the location on that host. This needs to be a writable and empty directory.
5. Once collected please compress any individual *.gz files into a single .zip, .tgz, or .tar file for each switch data was collected from.
6. Upload the compressed switch supportsave to How to Upload Files to TUF
SupportShow Data Collection
***Please note that SupportShow Data Collection only provides limited information for our Global Support Center. It is highly recommended that a Supportsave be uploaded to your case immediately to help expedite your requests***
This is a non-disruptive procedure and can be performed by the CE or the customer.
You can use your favorite terminal emulation utility. Refer to the respective documentation for how to turn on capturing output to a file.
Telnet or SSH
- Telnet or SSH into Brocade switch
- Enter username and password
- Start logging to file on the Telnet session.
NOTE: For Windows standard telnet, this is under the terminal pulldown menu. - Enter command: supportShow
- Upload the telnet log to How to Upload Files to TUF
Brocade SANnav
How To Gather A Switch Technical Supportsave Using SANnav
To generate the latest switch SupportSave data, perform the follow steps:
- Click SANnav in the navigation bar, and then select Services > Supportsave Management.
- Click the more icon (...), and then select Bulk Edit.
- Select one or more switches for which you want to generate a SupportSave.
- Click Edit, and then select Generate.
- Location
- If you select Internal as the location, enter the protocol as either SCP or SFTP.
The default location for internal storage is <install_home>/data/filetransfer . - If you select the External as location, enter the path to which to save the SupportSave files, select the protocol SCP, SFTP, or FTP, enter the host IP address, and enter the login credentials for the external server. You can select the Save Login information check box to save the login information for the future.
- If you select Internal as the location, enter the protocol as either SCP or SFTP.
- Click OK to start generating the Switch SupportSave.
- The folder where the switch SupportSave files are generated is suffixed with a yyyy-mm-dd date format.
- Upload the compressed data to the Hitachi Global Support Center’s Technical Upload Facility found here:
- How to Upload Files to TUF
- Contact the Global Support Center by phone after your upload if your data analysis is urgent!
NOTE: Brocade SANnav Management Portal Support Data Collection (for the SANnav server application) can be collected by selecting the 'SupportSave' option.
See How to Gather a Brocade SANnav Management Portal Support Data Collection
Brocade Network Advisor (BNA) - End of Support
How To Gather A Switch Technical Supportsave Using BNA
You can capture technical support and event information from within BNA, using the 'Technical SupportSave' option, which uses BNA's built-in FTP, SCP, or SFTP server. If the switch is running Fabric Operating System (FOS) 5.3.X or later, BNA uses the SCP server to save data (if configured). To make sure the built-in FTP, SCP, or SFTP server is configured correctly, refer to "Configuring an external FTP, SCP, or SFTP server" in the Brocade Network Advisor SAN Manual.
- Select 'Technical Support' From the 'Monitor' menu within the Network Advisor application
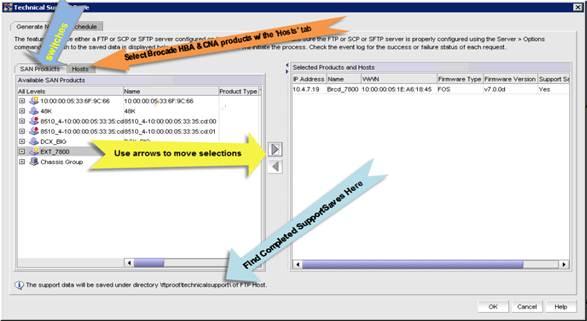
- Select the second option 'Product/Host SupportSave' (Do not select 'Supportsave'. 'Supportsave' is for BNA specific logs only)
- Brocade switches are referred to as 'SAN Products'
- Brocade HBA's and CNA's are referred to as 'Host Product'
The 'Host' SupportSave option is only for Brocade HBA's and CNA's


- Click the 'SAN Products tab' and select the switch(es) you want to collect data for in the 'Available SAN Products' pane, and then click the right-facing arrow to move selections to the 'Selected Products and Hosts' pane on the right

- Click 'OK' to begin generating the SupportSave data from the switch(es). In this example, a Brocade 7800 is selected

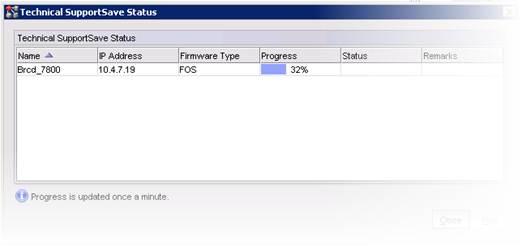
- The 'Technical SupportSave Status' window will be displayed, indicating progress as the SupportSave script begins to collect data from the switch(es)

- Upon successful completion, click 'OK' to close the window
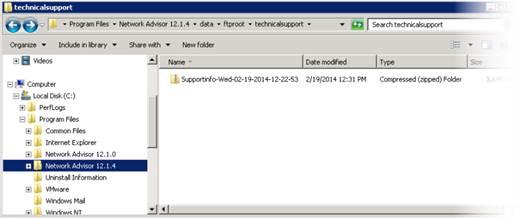
- Technical SupportSave data for 'SAN Products' is compressed and saved to the following directory as:
- Network Advisor 1x.x.x\data\ftproot\technicalsupport\Supportinfo-Day-mm-dd-yyyy-hh-mm-ss.zip
- Upload the compressed data to the Hitachi Global Support Center’s Technical Upload Facility found here:
- How to Upload Files to TUF
- Contact the Global Support Center by phone after your upload if your data analysis is urgent!
NOTE: Brocade Network Advisor Server or Client SupportSave (for the BNA server application) can be collected by selecting the 'SupportSave' option.
See How to Gather a Network Advisor Server Application SupportSave
CXOne Metadata

