

Summary
Issue / Objective / Question
Provide instruction on how to Managing Your MFA Factors via Profile on Hitachi Vantara SSO profile
Environment
Hitachi Vantara SSO, Partner Connect, Support Connect, Knowledge, Docs, Community, Downloads and other apps that requires authentication via SSO
Content
Managing Your MFA Factors via Profile
Once you've completed your initial Multi-Factor Authentication (MFA) setup, you can manage and expand your authentication methods directly from your user profile. This provides flexibility and control over your login security.
🔐 Security Settings Overview
Navigate to your profile and click the Security Settings tab. Under the Multi-Factor Authentication section, you'll see:

Security Settings Tab
 A list of all enrolled factors (Authenticator Apps and Security Keys)
Status indicators (enabled/disabled)
Enrollment and last used timestamps
The option to enroll additional factors
You may register multiple authentication methods of each type for better accessibility and backup options.

➕ Enrolling an Additional One-Time Password (TOTP) Factor
If you want to add authenticator app from your profile, follow the steps below:
1. Click “Enroll One-Time Password”
Locate the Authenticator App section and click the + Enroll One-Time Password button.
This action will launch a secure child window.
2. Verify with an Existing Factor
Before proceeding, you'll be asked to verify your identity using a previously enrolled MFA factor. This step ensures that only legitimate users can modify security settings.
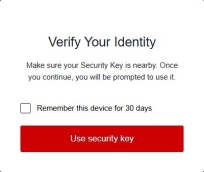
Verify Existing Factor
3. Scan the QR Code
Once verified, you'll be redirected to a page displaying a QR code.
 Open your preferred authenticator app (e.g., Google Authenticator, Microsoft Authenticator, Okta Verify).
Scan the QR code using the app.
If you experience difficulties scanning, a manual entry key is available below the QR code.
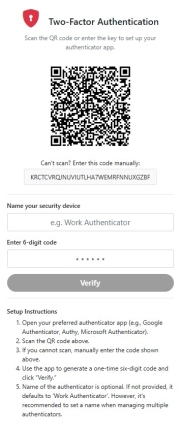
TOTP Setup Screen
4. Name Your Device and Enter the Code
Next, assign a recognizable name to your device (e.g., Google Authenticator) and input the 6-digit code currently shown in your app.
5. Confirmation and Automatic Redirect
Once the code is validated, you'll see a success message confirming that your authenticator app was enrolled correctly.
The window will close automatically in 5 seconds, and you'll be redirected back to your profile.
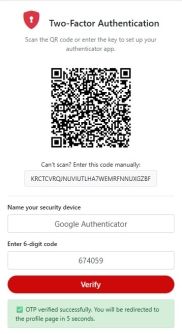
Successful Enrollment
🔁 Back on the Security Settings Page
You will now see the newly enrolled authenticator app listed under your MFA factors. You'll also have the option to enroll another TOTP factor if desired.
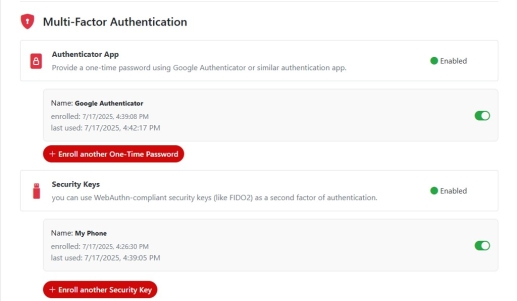
Updated Factor List

➕
➕ Enrolling Another Security Key from Your Profile
In addition to enrolling MFA during your first login, you can also manage and add new authentication methods anytime from your Security Settings tab on the profile page. This is especially helpful if you want to register multiple devices for backup or convenience.
Here's how to enroll an additional Security Key:

1. Click “Enroll another Security Key”
Locate the Security Keys section and click the + Enroll another Security Key button.
This action will trigger a process to securely add another device or key.

2. Provide a Friendly Name
You'll be prompted to name the new key. This label will help you easily identify your keys later in your profile.
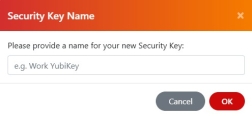
Name Your Security Key

3. Select a Device for Your Security Key
After naming your key, your browser will open a system window prompting you to select the device you'd like to use as your security key.
This could be:
 A smartphone with biometric capabilities (e.g. Face ID, fingerprint)
A physical security key (e.g. YubiKey, USB-C token)

Choose Device
Follow the on-screen instructions on your phone or device to complete the biometric or hardware key registration.

4. Success Confirmation
Once your authentication is complete, you'll see a confirmation message letting you know that the key was successfully registered.
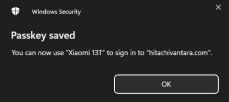
Success Message

5. New Key Appears in Security Settings
After closing the success window, the page will automatically refresh and you will now see your newly enrolled key listed under Security Keys, alongside any previously registered devices.
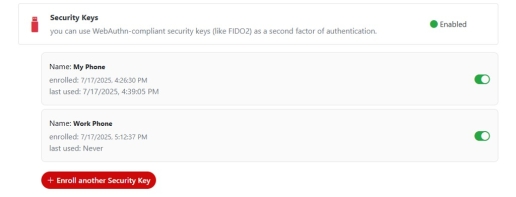
Multiple Factors of the Same Type
You can repeat this process anytime to add more keys.

 Removing an MFA Factor
If you no longer wish to use one of your enrolled MFA methods (e.g., a specific Authenticator App or Security Key), you can easily remove it from your account via the Security Settings tab.
1. Initiate Factor Removal
To begin, go to your Security Settings and locate the MFA factor you'd like to remove. Click the toggle switch next to it. This action will open a confirmation prompt.
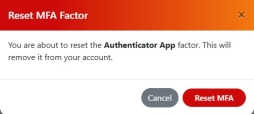
Reset MFA Confirmation
Youʼll see a warning that this action will permanently remove the selected factor from your account.
2. Authenticate Before Removing
After confirming, you will be redirected to the MFA verification screen, where you will need to prove your identity using any other enrolled factor (e.g., Security Key or Authenticator App).
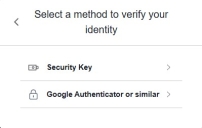
Choose an authentication method
Once you select the method, enter the requested credentials (e.g., a 6-digit one-time password):
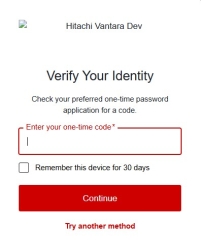
Verify using your selected factor
3. One-Time Authorization Prompt
For additional security, the first time you attempt to remove an MFA factor, you will be prompted to authorize this action.
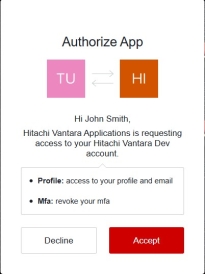
Application access request
Read the prompt carefully and click Accept to grant the Hitachi Vantara Applications permission to revoke MFA factors on your behalf. This is a one-time prompt — future resets will not require this step.
4. Return to Profile
Once authorized and verified, the selected MFA factor will be removed from your account, and you'll be redirected back to the Profile Page. From there, you can manage your remaining factors or enroll new ones at any time.