Hitachi Vantara Single Sign On (SSO) Multi-Factor Authentication (MFA) Setup Guide
Summary
Issue / Objective / Question
Provide instruction on how to setup Hitachi Vantara Single Sign On (SSO) Multi-Factor Authentication (MFA)
Environment
Hitachi Vantara SSO, Partner Connect, Support Connect, Knowledge, Docs, Community, Downloads and other apps that requires authentication via SSO
Content
Multi-Factor Authentication (MFA) Setup Guide
To enhance the security of your account, Multi-Factor Authentication (MFA) will soon be required for all users. MFA adds a second layer of protection by requiring you to verify your identity using an additional method beyond your password.
Youʼll be prompted to set up MFA after logging in. This process is quick, secure, and ensures that only you can access your account—even if your password is compromised.
Step 1: Landing on the MFA Setup Page
After logging in, you will be redirected to the MFA Setup Page, where you will see a notification informing you that MFA will become mandatory (starting October 15). We strongly recommend setting it up as early as possible to avoid any login interruptions.

MFA Setup Widget
This page provides two options:
 Enroll Multifactor Authentication – to begin the setup process.
Skip MFA Setup – you can postpone the setup for up to 7 days, but will be required to complete it eventually.
⚠ If you skip MFA, youʼll continue receiving reminders until it is set up. We advise completing the setup now for uninterrupted access.
Step 2: Launching the Enrollment Window
Click the "Enroll Multifactor Authentication" button.
A secure popup window will open where you can select your preferred MFA method:
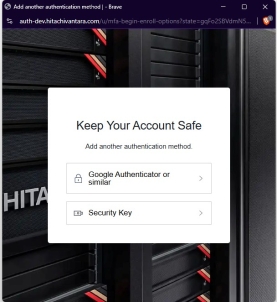
Possible Factor Enrollment
You can choose from:

🔐 TOTP (Authenticator App) Enrollment Guide
If you choose to secure your account using an Authenticator App such as Google Authenticator, Microsoft Authenticator, or Okta Verify, follow the steps below to complete your enrollment:
Step 1: Scan the QR Code
Once you click "Enroll Multifactor Authentication", a new window will open with the Secure Your Account screen showing a QR code.
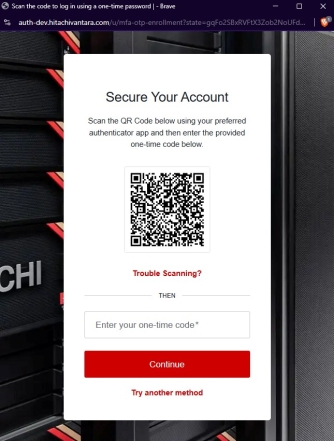
Authenticator App Enrollment
- Open your preferred authenticator app on your mobile device.
- Choose the option to add a new account or scan a QR code.
- Scan the displayed QR code.

Step 2: Enter the One-Time Code
Once your app recognizes the QR code, it will begin generating 6-digit time-based codes.
- Enter the current 6-digit code shown in your app into the “Enter your one-time code” field.
- Click Continue.

Step 3: Enrollment Confirmation
If the code was valid, youʼll see a confirmation screen:

Success Message
Youʼve successfully added a new authentication factor.
You can now close the window, and you'll automatically be redirected to the next step.

Step 4: Verify Your Identity
Youʼll be prompted to verify your identity by entering a new code from the authenticator app (the same app you just set up).
- Enter a fresh, unused 6-digit code.
- Click Continue.

Verify Your Factor
Once verified, youʼll be redirected to the protected page you originally intended to access.

🔐 Enrolling with a Security Key
If you choose to use a Security Key as your multi-factor authentication method, you'll follow a simple and secure process that allows you to use biometric-enabled devices (like your phone) or physical security keys (like YubiKey).
1. Select Security Key
On the MFA setup screen, click the Security Key option. A new window will open showing instructions and a Use security key button.
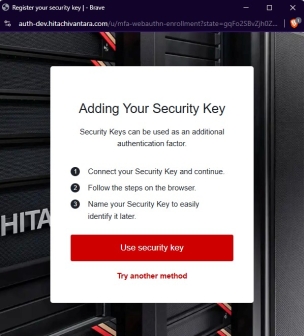
Security Key Enrollment

2. Choose Device and Complete Authentication
After clicking the button, your browser will prompt you to select the device you'd like to use for authentication. This could be:
 A phone with biometrics (e.g. fingerprint or face recognition)
A hardware key (e.g. YubiKey)
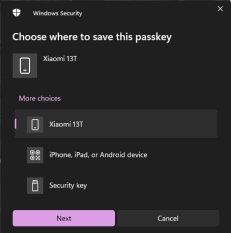
Choose Your Device
Follow the on-screen instructions to complete the process. You may need to interact with your device, for example by unlocking your phone or touching your key.
Once authentication is complete, you will see a success confirmation:
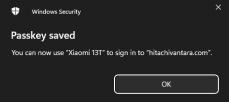

3. Name Your Security Key
To help you manage multiple keys in the future, you'll be prompted to assign a friendly name to your key (e.g. “My Phone” or “Work YubiKey”).
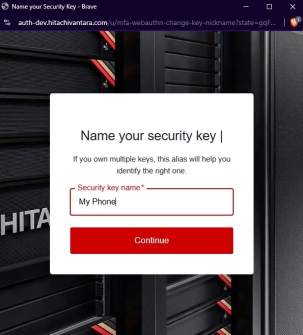
Name Your Security Key

4. Final Confirmation
After naming your key, you will see a final confirmation that your Security Key has been successfully registered.
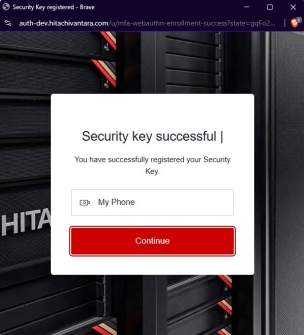
Successful Setup
Click Continue to complete the enrollment.

5. Verify with Your Security Key
Just like with TOTP, youʼll now be asked to verify using the security key you just enrolled. If prompted, simply reconnect your phone or tap your hardware key to confirm.
Once verification is successful, you will be redirected to the page you originally tried to access.

⏳ Postpone MFA Setup (Skip Option)
We understand that you might not be ready to set up Multi-Factor Authentication (MFA) immediately. For this reason, we provide the option to temporarily skip MFA setup — but with a few important notes.
🛑 Skip Button Location
At the bottom of the MFA enrollment widget, youʼll find a “Skip MFA Setup” button When clicked, a confirmation screen will appear:
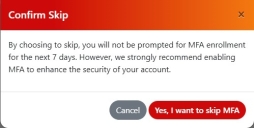

🔐 What Happens If You Skip?

📅 Deadline: June 7, 2026
Starting June 7, 2026, MFA will become mandatory for all users.
At that point:

✅ Our Recommendation
We strongly encourage you to complete MFA setup as soon as possible. Enabling MFA enhances the security of your account, helps prevent unauthorized access, and ensures smooth access to your resources without interruption once the policy becomes enforced.
Solution Properties
- Keywords
- MFA 2FA Portal SSO
- Solution ID
- 250829111224293
- Last Modified Date
- 08/29/2025 11:12:24 AM
- Taxonomy
- Collections
-
- Guest (Public)
- Views
- 0