SVP3 OS Recovery USB Creation Instructions
Summary
The article provides instructions for creating an SVP OS Recovery USB to recover the Service Processor 3 (SVP3) operating system. The process involves downloading the SVP3-OSRecoveryUSB.exe file, formatting a USB drive, and extracting the recovery files to the USB drive.
Content
Objective
- Recover the SVP OS for SVP3
- SVP3 OS Recovery USB Creation Instructions
Environment
- Service Processor 3 (SVP3)
- Windows 10 Version 1809 LTSC
- SVP OS Recovery USB (Minimum 512 MB)
- VSP Gx00 and VSP Fx00 (DW800, HM800)
- Virtual Storage Platform Gx00 (VSP Gx00): VSP G200, VSP G400, VSP G600, VSP G800
- Virtual Storage Platform Fx00 (VSP Fx00): VSP F400, VSP F600, VSP F800
- VSP N Series (DW800, HM800)
- VSP N400, VSP N600, VSP N800
- VSP G130 G/F350 G/F370 G/F700 G/F900 (DW850, HM850)
- VSP G130, G350, G370, G700, G900
- VSP F350, F370, F700, F900
- VSP E Series (DW900, HM900)
- VSP E990
Procedure
Prerequisite: Download SVP3-OSRecoveryUSB.exe (MD5: 9e8e189f878e036f506829c569179e7c)
- Insert USB Drive into Computer (minimum 512MB USB stick)
- Launch Windows Command Prompt as Administrator
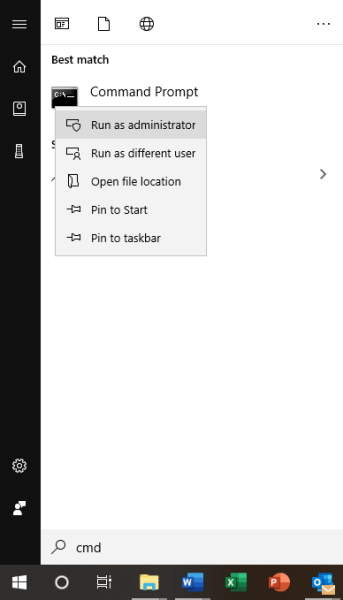
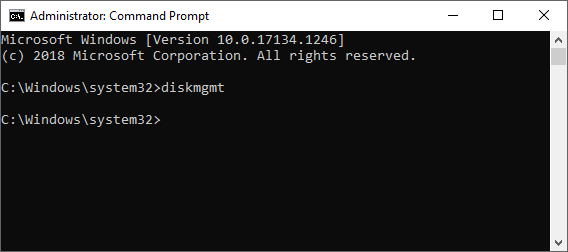
- Launch Windows Disk Management by typing diskmgmt in the Command Prompt window
- Carefully select and then right-click the USB drive in the “Volume” column of the USB drive
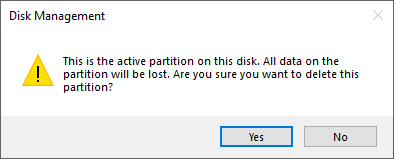
- Click Delete Volume… from the list of options

- Review all warning prompts
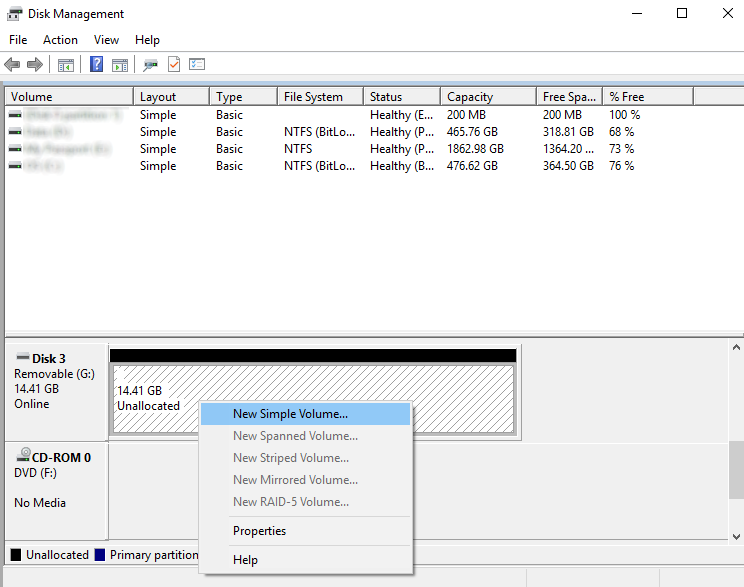
- Right-click the Unallocated space generated
- Click New Simple Volume…
- Click Next> until the “Assign Drive Letter or Path” screen is displayed
- Assign a NEW drive letter that is not currently being used by another volume OR network mount
(do not use the previous drive letter and be careful of non-listed network drives) - Click Next>

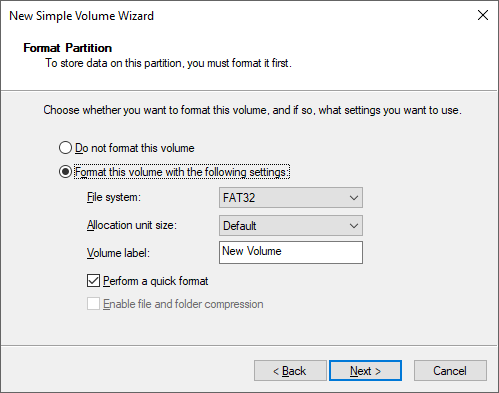
- Format the volume with the following settings
(Volume Label can be changed to the desired value; however, keep everything else the same as the below screenshot) - Click Next>
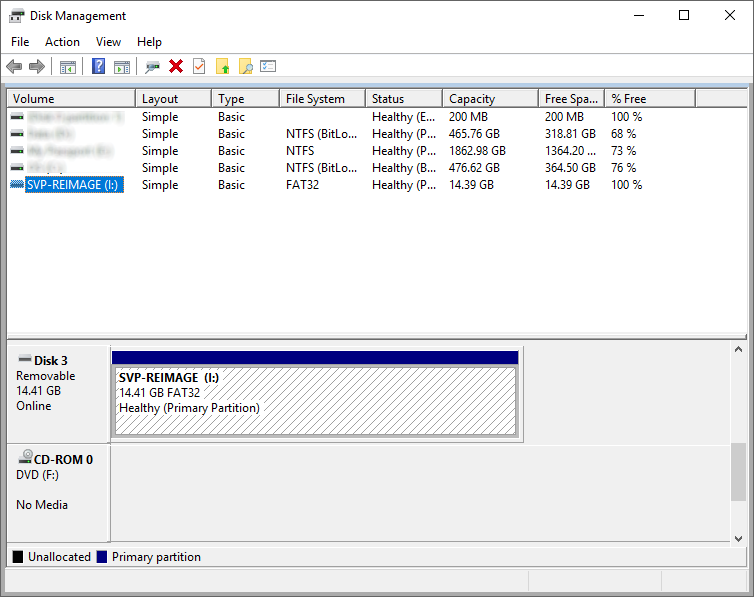
- Confirm the volume and assigned drive letter shows up in the listed volumes
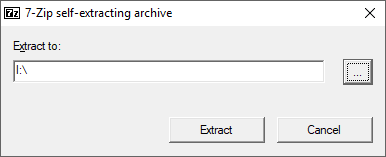
- Run SVP3-OSRecoveryUSB.exe
- Click the button with three dots to browse to the USB drive

- Click the Extract button
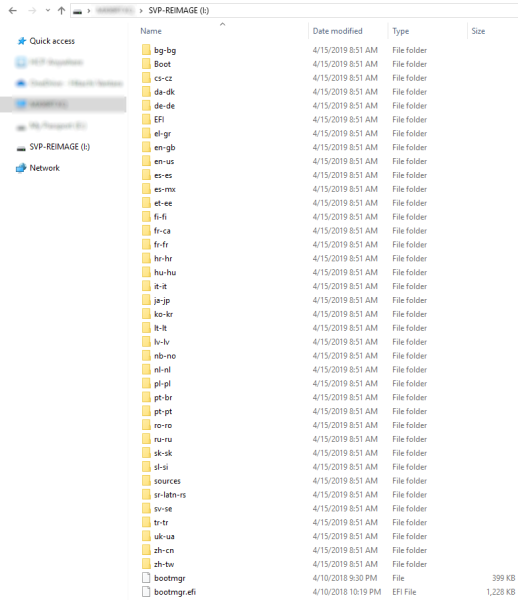
- Validate the USB drive now has the following files and folders copied to it
- Properly Eject the USB drive from Windows before removing it from the computer
Additional Notes
- Do not use the download in this article for VSP 5000 series.
- Click Here for VSP 5000 Series
- Do not use these instructions for SVP2 (runs Windows 10 Version 1607 LTSB)
- Click Here for SVP2 Instructions
- Download SVP3-OSRecoveryUSB.exe (MD5: 9e8e189f878e036f506829c569179e7c)
- When possible...
- Create a Storage Navigator backup before reimaging and restore it once the reimage is complete
- Make note of the customer’s Windows and Array Network settings (IPs, Subnets, Gateways, DNS servers, proxies, etc…) before restoring the OS
- If the customer uses out-of-band command devices on the SVP (CCI), be sure to copy over any *.conf files from C:\Windows directory
- If in doubt, run the Windows Getconfig on the SVP
- For SVP OS Recovery Procedure, see SVP3 Technical Reference
- The default credentials for SVP3...
- ...are SVP/raid-login
- The new password must meet complex password requirements, see: VSP Gxx0 and Fxx0 SVP New Password Error about Length, Complexity, or History
- Do not forget to at a minimum disable the password expiration period: How to Change the SVP Password Requirements on Windows 10 (For Customer Managed SVPs)
- ...are SVP/raid-login
- Once the SVP OS is recovered, microcode and OSS are installed, and the configuration is restored, do not forget to (in order)
- If applicable, install and configure Hitachi Remote Ops SVP Agent (formerly Hi-Track SVP Agent)
- HM800 Only. HM850 and HM900 use Remote Ops Monitor Agent.
- Enable and test Secondary Windows within Hitachi Device Manager - Storage Navigator
- Launch Hitachi Device Manager – Storage Navigator from a web browser (Internet Explorer or Edge), the “Secondary Windows” setting cannot be set from Web Console because it already has the features built-in.
- Harden the SVP to the customer's specifications
- At this time there is no SVP Hardening Tool for the SVP3.
- Email Keith Johnson and Brian Williams for inquires on hardening tools/procedures for SVP3.
- Set Windows Defender Settings
- Install SVP Security Updates
- If applicable, install and configure Hitachi Remote Ops SVP Agent (formerly Hi-Track SVP Agent)
Attachments
Attachment: 7374_20240807162219_240417000162072.pdf
Attachment: 7374_20240807162219_240417000162074.exe
Attachment: 7374_20240807162219_240417000162074.exe
CXOne Metadata
Tags: Enterprise, HM800, SVP, VSP Gx00 and VSP Fx00, USB, OS Recovery, Reimage, Windows 10, HM850, VSP G130 G/F350 G/F370 G/F700 G/F900, VSP N Series, VSP E Series, HM900, SVP3
PageID: 125717
Legacy URL: https://knowledge.hitachivantara.com/Knowledge/Storage/SVP3_OS_Recovery_USB_Creation_Instructions
Solution Properties
- Keywords
- SVP3 USB Recovery Reimage raexternalrequest
- Solution ID
- 240403060125717
- Last Modified Date
- 11/20/2024 12:33:21 PM
- Attributes
-
Page Privacy and Permission Assignment
- Page Privacy: Private
- Page Level Permissions: Support Center; Employee; Service Partner; Knowledge Author; Knowledge Editor; IT; eServices; Knowledge Draft
- Article: howto
- Pagetype: knowledgearticle
- Taxonomy
- Collections
-
- Service Partner
- Views
- 0