

Content
Objective
- Gather a System Option Mode 31 (SOM31) detailed dump
- Enable Mode 31
Environment
- Hitachi Block Storage with a Service Processor (SVP) or Maintenance PC (MPC)
- VSP 5000 Series (R900, raid900, DKC910I)
- VSP G1X00 and VSP F1500 (R800, raid800, DKC810I)
- VSP E Series (HM850, HM900, HM1000)
- When an SVP or MPC is available
- VSP G130 G/F350 G/F370 G/F700 G/F900 (HM850, DW850)
- VSP Gx00 and VSP Fx00 (HM800, DW800)
- VSP N Series (HM800, DW800)
- System Option Mode (SOM)
Procedure
1. RDP/Log into SVP
1a. Before gathering any dump:
- Perform LAN Test
This will check to make sure all MPs are communicating properly and the results of the test are updated in the dump data - Open the 'Maintenance Panel'
This will refresh the maintenance display and provide the current maintenance status of the array - Check that Maintenance Panel "Pin..." button is grayed out.
If "Pin..." button is not grayed out, click it and archive pinned data - Open 'Version Information' from the Maintenance panel
This refreshes the microcode data on the SVP and makes sure the latest information gets into the dump - In the case of mainframe subsystem
Display 'Mainframe Paths'
Turning on System Option Mode 31
2. Click on SVP Window
3. Press CTRL – SHIFT – M at the same time on your keyboard
4. The password for the dialog box is: mode
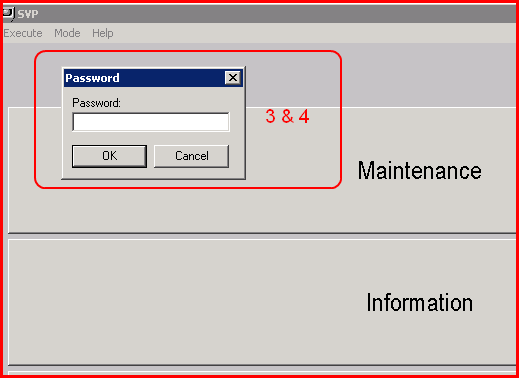
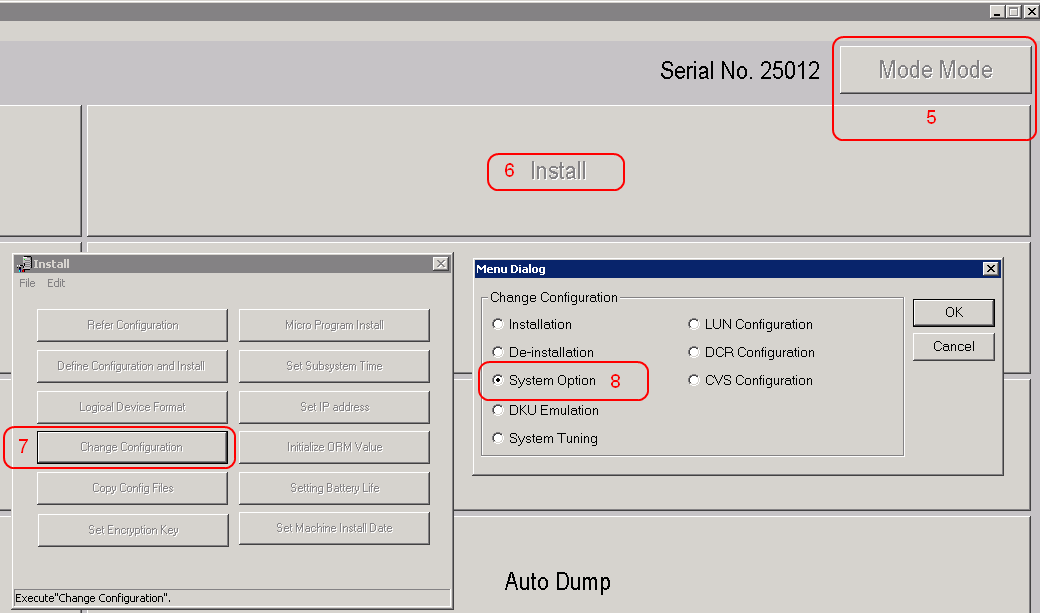
5. Notice the SVP has changed from ‘View’ to ‘Mode Mode’
6. Select ‘Install’
7. Select ‘Change Configuration’
8. Select ‘System Option’ and click ‘OK’
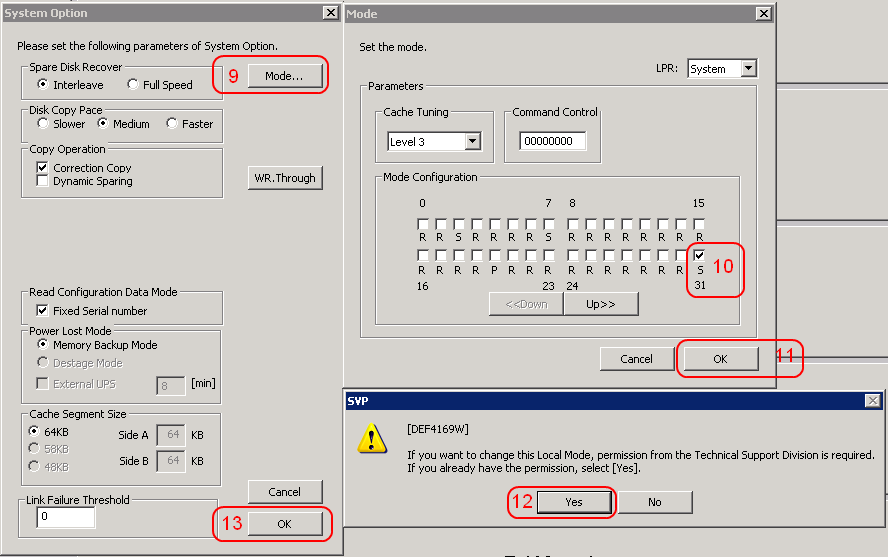
9. Select ‘Mode’ at the top right of System Options window
10. Click the ‘Up>>’ or ‘< <down< trong=""> ’ button until you see SOM 31 and check right above the ‘ S’ </down<>
11. Click ‘OK’
12. If you have permission from GSC to turn on System Option Mode 31, click ‘Yes’
13. Press OK in the pop-up confirmation window, then under the System Option window press OK.
14. Best practice is to back up your SVP configuration on a removable disk after any changes.

Collecting a Detailed DUMP
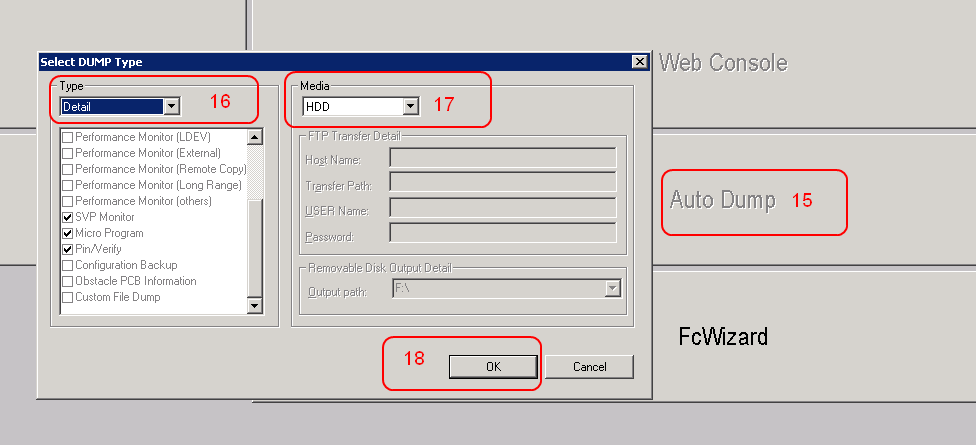
15. In the Main SVP screen, click ‘Auto Dump’
16. Under ‘Type’ select ‘Detail’
17. Under ‘Media’ Select ‘HDD’
18. After making your selections, press ‘OK’
Turning Off Mode 31
19. After the Detailed DUMP is complete, you should be prompted to turn off Mode 31. Select ‘Yes’
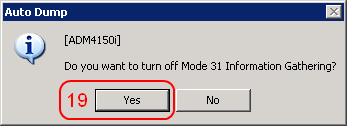
20. If you do not receive this prompt, please repeat Steps 6 through 14 and UNCHECK Mode 31 in Step 10.
Changing back to ‘View Mode’
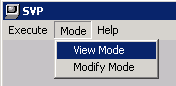
21a. Click on ‘Mode Mode’ to change SVP back to ‘View Mode’

21b. Click on Mode -> View Mode in the Main SVP window.
Finding the Detailed DUMP
22. Go to C:\DKC200\TMP and you will find hdcp.tgz
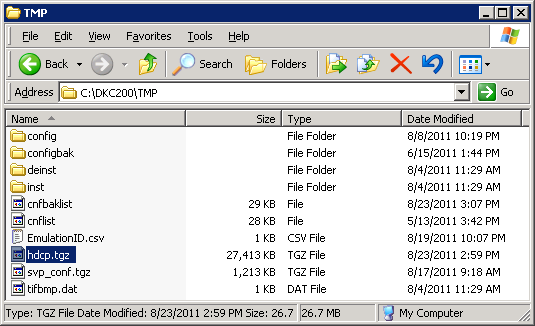
23. Copy the file off the SVP and upload the DUMP to https://tu f.hds.com/upload.php using your Service Request number.
24. Disconnect your RDP session from the SVP. Exit out, do not log off. You should receive a screen that looks similar to:

Additional Notes
-
If you are performing a Mode 31 Detailed DUMP on a Hitachi Virtual Storage Platform (VSP) your first step will be Maintenance -> Maintenance Components (General) to get into the Main SVP window:
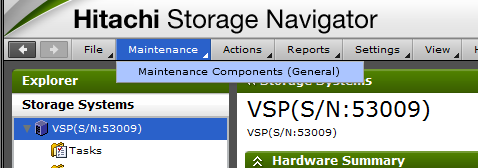
- For additional information about RAID data collection and types of auto dump please see https://tuf.hds.com/instructions/hardware/RAIDData.php
- This information is Hitachi Vantara Confidential and is not to be shared with customers.
CXOne Metadata
article:howto,System Option Mode,SOM,pagetype:knowledgearticle,VSP G1x00 and VSP F1500,enable,VSP 5000
Page ID: 854