

Content
Objective
- How to configure Remote Ops (Hi-Track) Remote Monitoring system (Remote Ops (Hi-Track)) infrastructure to use the HTTPS data transport method (the default transport method used by Remote Ops (Hi-Track)).
- How to convert from the older, less-secure FTP transport method to HTTPS data transport (Hitachi Vantara will no longer transport of Remote Ops (Hi-Track) data over FTP as of May 5, 2021).
Environment
- Remote Ops (Hi-Track)
Procedure
If your Remote Ops (Hi-Track) infrastructure is currently using FTP as the data transport method converting it to use HTTPS will require re-configuring the following applications:
- The Remote Ops (Hi-Track) Monitor application must be configured for non-enterprise storage products.
- The Remote Ops (Hi-Track) service processor (SVP) agents must be configured for each Hitachi enterprise storage array in your environment.
Procedures for performing both parts follow below:
Configuring Remote Ops (Hi-Track) Monitor to Use HTTPS
Preliminary Steps
The Remote Ops (Hi-Track) Monitor application must be installed on a host platform that supports Transport Layer Security (TLS) protocol v1.2 or later. If Remote Ops (Hi-Track) Monitor is installed on a host platform that does not support TLS v1.2, please update the platform’s operating system to a supported version. The following Microsoft operating systems are supported by Remote Ops (Hi-Track) Monitor, and are also known to natively support TLS v1.2: Microsoft© Windows© 7, Windows 2008 R2, Windows 2012, and Windows 2016. Selected Linux distributions are also supported by Remote Ops (Hi-Track) Monitor and may provide TLS v1.2 support with the relevant patches/updates.
Please ensure Port 443 on the Remote Ops (Hi-Track) Monitor server can remotely access the following four Remote Ops (Hi-Track) transfer servers:
ushtinet01.hds.com
ushtinet02.hds.com
usdenhtinet01.hds.com
usdenhtinet02.hds.com
1. Log into Remote Ops (Hi-Track) Monitor as user "Administrator" (the default administrator password is "hds", no quotes), and then navigate to the Transport Agent Configuration page by first clicking the Configuration tab and the Transport Agents tab.

2. At the Transport Agent Configuration page, select HTTPS (ushtinet01) via the drop-down selector. The HTTPS agent’s default configuration values will automatically populate for you. Local Interface should be set to any. If a proxy server is used, please provide here the relevant server-related values (e.g. proxy type, IP address, and port). Additionally, if proxy authentication is used, the entered credentials must be static.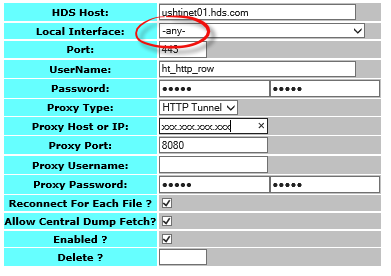
3. Press the Submit button to accept these values and commit the addition of the first HTTPS data transfer agent.
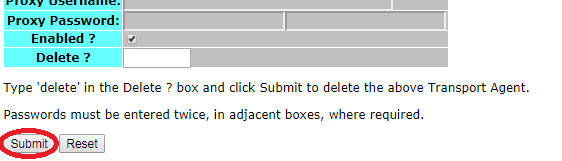
4. Repeat steps 2 to 3 to create a second HTTPS agent. This time specify HTTPS (ushtinet02) from the drop-down selector menu and click the Submit button. You will be presented with the configuration information for the second HTTPS agent; specify any non-default settings here. "Local Interface" should be set to "-any-". If a proxy server is used, provide the relevant server-related values (e.g. proxy type, IP address, and port). If proxy authentication is used, the entered credentials must be static.
5. Repeat steps 2 to 3 twice more to create a third and fourth HTTPS agent, this time specifying HTTPS (usdenhtinet01) and HTTPS (usdenhtinet02).
6. Press the Submit button to accept these values and commit the addition of the second HTTPS data transfer agent. You should now have four HTTPS entries, as shown below, signifying that both a primary and a secondary/redundant HTTPS data transfer agent have been configured:
7. To delete existing entries for FTP data transfer agents, select the Index radio button next to the FTP agent’s entry, type delete in the Delete? text box, and click the Submit button. Perform this for each entry corresponding to an FTP transfer agent.
8. Lastly, please verify that data transport is successful by clicking on the Transport History tab at the top of the page. This will take you to the Transport Activity Display page. Click the Request Report button at the bottom of the page. If you configured data transport successfully via steps 1-6 above, you should see a corresponding entry/acknowledgment in the Transport History list.


Configuring the Remote Ops (Hi-Track) SVP Agent on Enterprise Storage Arrays to Use HTTPS
Perform the following procedure on the service processor (SVP) of each Hitachi enterprise storage array in your environment.
Preliminary Steps
The SVP must have version "CF" or later of the Remote Ops (Hi-Track) SVP agent installed. Please contact your local Hitachi Vantara team if the Remote Ops (Hi-Track) SVP agent needs to be upgraded.
1. Open the Remote Ops (Hi-Track) service manager application, and click the Center tab to navigate to the Hi-Track Center screen.
2. Please remove any currently configured FTP transport methods. If an FTP transport method is listed in the Contact Attempt Sequence list, click on it and click the Remove button. Repeat this for all FTP entries. Once the Contact Attempt Sequence list is empty, add the first of the four HTTPS transfer method entries: click the Add button, select the radio button next to HTTPS (ushtinet01) and click the Continue button.
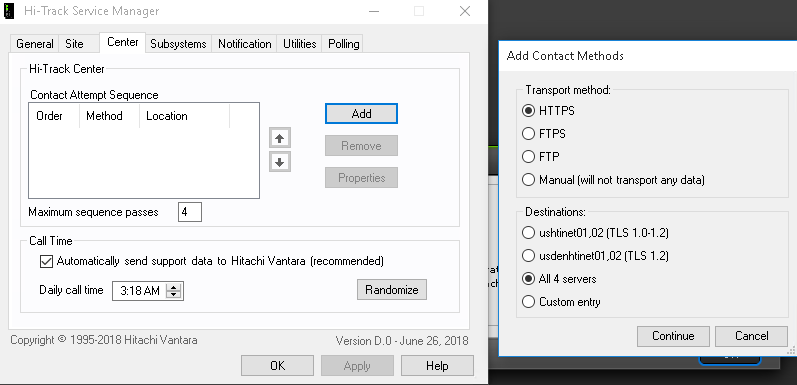
3. After clicking Continue, the HTTPS Method Properties screen will appear. The transport method’s default configuration values will automatically populate for you. If a proxy server is used, please provide the relevant server-related values (e.g. proxy type, IP address, and port). Additionally, if proxy authentication is used, the entered credentials must be static. Click the OK button to accept these values.

4. Click Apply to commit these modifications.

5. If a proxy server was specified in steps 3 and 4, please go to the AutoDumps tab and click on Polling Information to bring up the AutoDump Polling Configuration screen. Under the section HTTP Proxy Server, please enter the same proxy settings you specified in steps 3 and 4.

6. Lastly, initiate a test transfer to determine if configuration was successful: click on the Utilities tab. Under the Manual Transfer to Remote Ops (Hi-Track) Center section, uncheck Generate new data files and click the Transfer Now button.

Click on the General tab and then click Site Manager Log. If the data transport configuration is successful, you should see "Transfer Completed Successfully" in the Site Manager Log.