Content
How to gather an Data Ingestor (HDI) Data Collection
The procedure for gathering logs for an HDI system depends on the HDI deployment: Single-node, cluster, or HDI-VM. Also, the procedure is different for older HDI deployments. Click on the link for the appropriate procedure.
- Single Node, HDI-VM or HDI-RS
- Cluster
- Older Systems (HDI 2.7/FOS 3.0)
The procedure to gather an Alllogs collection for HDI systems can differ between HDI versions. The following instructions should work with HDI/FOS 4.x, except where indicated for older versions. Refer to the Administration Guide, User Guide or Troubleshooting Guide for the version and type of deployment installed and search for "download all log" if the procedures below aren't applicable.
Data Ingestor (HDI) Single Node, HDI-VM or HDI-RS Data Collection
- In the HDI admin GUI, click "Action menu" in the Global menu, and select [Download All Log Data].

- An "In Progress" window appears.

- Once the log collection is finished, a log collection completion window is displayed and [Download] button is activated.

- Click the [Download] button, and a window will pop up to allow you to specify the destination for the log data. When that's done, another "In Progress" window will be displayed.

When the progress reaches 100%, download is complete. A button on the bottom-right corner is changed to [OK]. Click [OK], and close the window. - Make sure that a file named "Alllogdata_<serial number> _<date and time>.tar.gz" is created in the destination to save specified in the above step 4.
- Upload data to TUF.
Data Ingestor (HDI) Cluster Data Collection
To download system message files, system log files, and other log files in a batch operation
- In the Explorer menu of the Hitachi File Services Manager main window, select Resources, and then Processing Nodes.

- In the object tree, select the target node and, in the window that appears, click Check for Errors in the Settings tab. [It may appear in the Basic subtab or Advanced subtab, depending on HDI version.]

- On the List of RAS Information page of the Check for Errors dialog box, from the Info. type drop-down list select Batch-download, and then click Display.

- Select the option for the log group you want to download (All log data), and then click Download.

Note: If you selected a PSB log group, before the download dialog box appears, another dialog box asking you whether to perform batch downloading appears. - In the Web browser download dialog box specify where to download the file. The log files that belong to the selected log group are archived by tar and compressed by gzip, and downloaded to the specified destination.
- Click Close in the download dialog box.
When you perform batch downloading, some data might be missed if the disk selected to store the Temporary Internet files folder for Internet Explorer has insufficient space. In this situation, Internet Explorer does not generate an error or message.
Repeat steps 2-6 for the other node in the cluster. - Upload data to TUF.
Data Ingestor (HDI) Data Collection (Older systems)
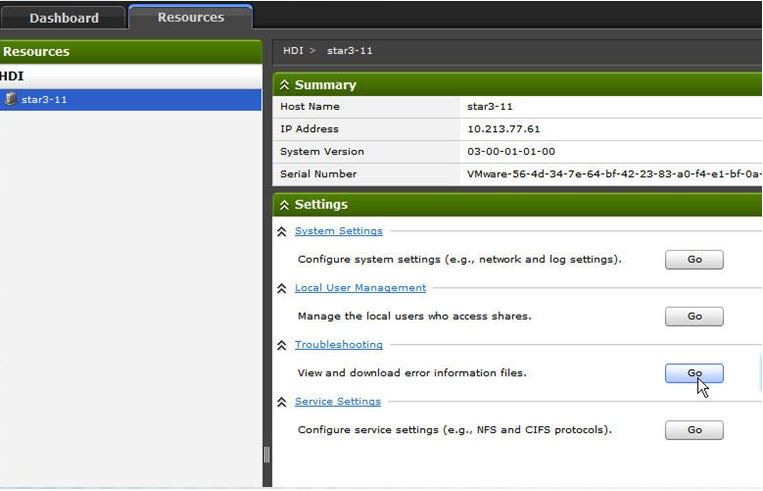
- Log in admin GUI and open Resources tab.
- Press Go button in Troubleshooting.

- Select Batch-Download from pull down menu and press Display.
- Check All log data and press Download.
- File download will start.
- In an HDI cluster, repeat steps 1-5 for the other node in the cluster.
- Upload File(s) to TUF.How to gather an Data Ingestor (HDI) Data Collection
CXone Metadata
Tags: Data Collection,article:qanda,HDI,pagetype:knowledgearticle,Logs,GUI,HDI Logs
PageID: 11846

