How to Get AMS/WMS “Physical View” Working with HDvM 5.1 or Later
How to get AMS/WMS “Physical View” working with HDvM 5.1 or later
- Get all the bits you will need
- HDvM 5.1 or higher must be installed and configured
- JRE 1.4.2_06+ must be installed on client and HDvM server (I use 1.4.2_08)
- Storage Navigator Modular 6.0 WEB GUI or later
- Install Storage Navigator Modular (SNM) 6.0 WEB GUI on the HDvM server
Just follow the “bouncing ball”. The rest of this document assumes a default installation.
- HDvM Integration
Start a Command Prompt and go to this directory:
“C:\Program Files\HiCommand\DeviceManager\HiCommandServer\tools”
Use the new program “launchapptool.bat”. This is what you will see:
launchapptool
1) Storage Navigator Modular (for Web) launch setup
2) Disk Array Management Program (for Web) launch setup
3) Delete launch settings
4) Exit
>1
Launch Settings for Storage Navigator Modular (for Web) will now start.
Specify the URL protocol.
1) http
2) https
Caution: To use https, settings to enable SSL communication
with the web server must be specified in advance.
Enter Value [default=1]
>1
Specify the IP address or hostname of the web server.
Enter Value [default=10.129.2.203]
>
Specify the port number of the web server.
Enter Value [default=23015]
>
Specify the port number for RMI communications.
Enter Value [default=1099]
>
Specify the installation directory path name of Storage Navigator Modular (for Web).
Caution: Make sure that the specified installation directory
path name ends with a forward slash (/).
Caution: Replace backslashes (\) with forward slashes (/)
in the specified installation directory path name.
Enter Value [default=C:/Program Files/Storage Navigator Modular Web/]
>
Launch setup has successfully completed.
You must restart the Device Manager Server and Common Component Services for these changes to take effect.
Exit - Default is n?(y, n):y
Exit
C:\Program Files\HiCommand\DeviceManager\HiCommandServer\tools>
If you do a default install, the tool will supply all the correct default parameters like IP address, directory etc. So, you can just hit “Enter” when prompted.
Restart all services
Go to the directory “C:\Program Files\HiCommand\Base\bin” and issue these commands:
- net stop "Hicommandserver"
- hcmdssrv /stop
- hcmdssrv /start
- net start "Hicommandserver"
Depending on the current state of the services, you will get output like this.
C:\Program Files\HiCommand\Base\bin>net stop "Hicommandserver"
C:\Program Files\HiCommand\Base\bin>hcmdssrv /stop
C:\Program Files\HiCommand\Base\bin>hcmdssrv /start
KAPM06438-I The HiRDB service has started.
KAPM05016-I Succeeded in starting of service. service-name=HBase Storage Mgmt Web Service
KAPM05016-I Succeeded in starting of service. service-name=HBase Storage Mgmt Common Service
C:\Program Files\HiCommand\Base\bin>net start "Hicommandserver"
The HiCommandServer service is starting.
The HiCommandServer service was started successfully.
Right Click the Taskbar and watch Task Manager. When CPU Busy returns to “normal levels”, you can assume HDvM is ready for login.
Alternatively, use the Start menu as follows:
- Start, All Programs, HiCommand, Device Manager, Stop Server with Common Services
Wait a minute for everything to stop. Then:
- Start, All Programs, HiCommand, Device Manager, Start Server with Common Services
Wait a minute and then login.
Test SNM/HDvM Integration
Test if the integration has worked. Remote Desktop (MSTSC) to the HDvM server and try it.
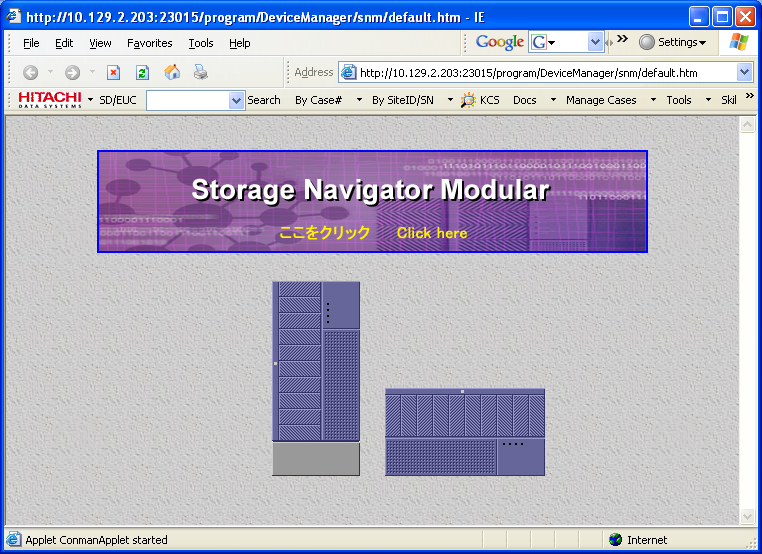
Make sure you type this exactly as shown! Change “10.129.2.203” to your HDvM server’s IP address.
http://10.129.2.203:23015/program/De...nm/default.htm
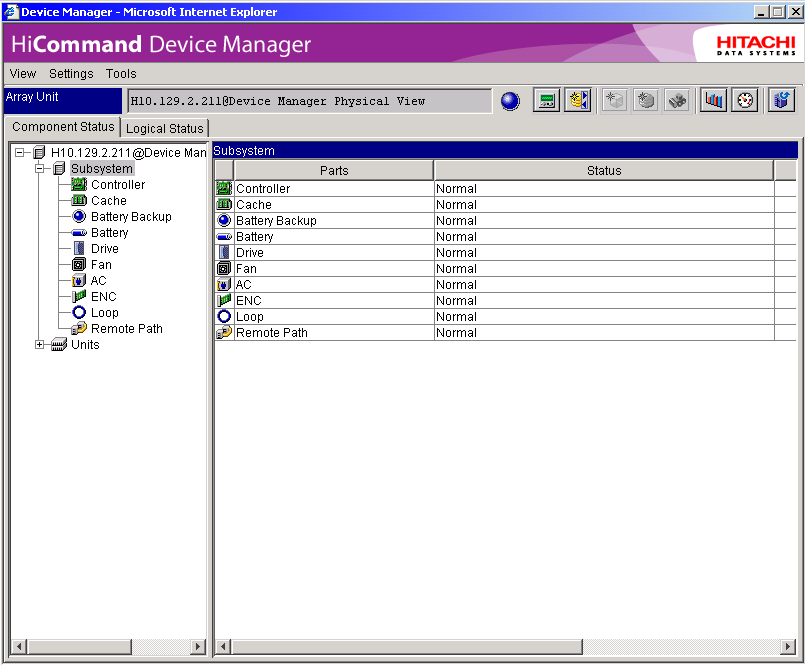
- Test Physical View
Refresh the subsystem. This is mandatory! When you refresh the subsystem, HDvM will create the correct entries in the SNM WEB GUI configuration files.
For example, an AMS500 with an IP Address of 10.129.2.211 will have an entry created called H10.129.2.211@Device Manager Physical View

Finally, click Physical View. If you have done everything correctly, you will get a SNM WEB GUI view of your AMS.
Now see if it works on a client workstation …